Installation guidance · Nexus 0.10.5
What are you setting up?
Remote team? Connect through a configured private or routed network. Connection help →
Admin · first setupCreate the shared library.
Start with one Windows Coordinator and a small, backed-up folder of sample footage. The examples below show a sample library; names and file counts will differ in yours.
-
Install and open the Coordinator app.
Install the Windows Coordinator supplied with beta 0.10.5 on the computer that will coordinate the library. To offload an editor’s renders, use a separate computer for the Coordinator.
Check: the Coordinator app opens.
If installation or startup fails
Keep the exact error and installer version for support before changing service settings.
-
Complete the first-run setup.
Set the Initial Admin password, choose Complete setup and restart the service from the app when prompted. The initial Admin username is
admin. Keep this account private; editors should use their own accounts.Check: open the Admin Panel from the app and sign in.
If the Admin Panel cannot connect
Check the Coordinator app’s service status and finish the requested restart.
-
Add a test folder, then approve it.
Choose Add Folder in the Coordinator desktop app. In the Admin Panel, open Shared Folders, select the Coordinator computer and approve the pending folder. Adding a folder and approving it are separate steps.
Check: the folder is approved in Shared Folders.

A new folder awaits Admin approval before it becomes available to editors. Select the image to enlarge. If the added folder is missing
Check that you added it on the intended machine and selected that same machine in Shared Folders.
-
Wait for indexing and proxy processing.
A proxy is an editing copy of a video or audio file. Check the folder’s status and proxy column. Approval does not mean all media processing has finished. For a first video or audio import, wait for its proxy to be ready.
Check: the folder is Ready and the sample clip’s proxy processing is complete.

This sample folder is Ready and its proxy processing is Completed. AI is disabled; it is not required for this workflow. Select the image to enlarge. If folder processing stays pending or fails
Check folder approval, the source computer’s connection and its access to the selected storage. Read the reported processing error before retrying.
-
Give an editor access to the folder.
Working alone? You carry out both roles: use Admin for setup and create your own Editor account for Resolve. These are accounts in your library; downloading Nexus needs no website signup. In Team, create or open the intended Editor account. In Permissions, select the ready folders they may use, then choose Save Permissions.
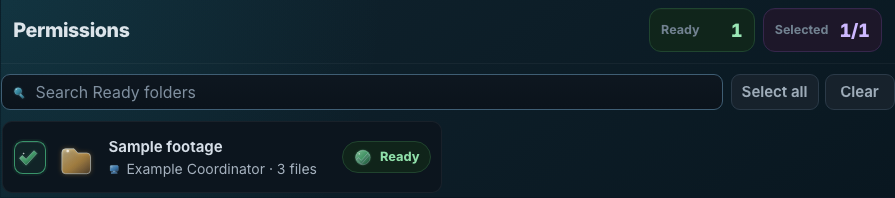
The selected folder is the access grant for this example Editor. Save Permissions applies the selection. Select the image to enlarge. Check: sign in using the editor’s own account and refresh the library; the permitted folder appears.
If the permitted folder is missing
Confirm its readiness and the saved permissions for that exact account.
-
Connect your first editor.
Follow the connection step using the Editor account, then import one prepared clip. A localhost or 127.0.0.1 address points to the editor’s own computer; it cannot connect them to a different machine.
Check: the clip appears in Resolve’s Media Pool and can be added to a timeline.
Connecting another editor or source computer
Share the Coordinator address reachable from the editor’s computer and their own account details securely. Additional source computers are optional; use the Worker guide when you need them.
Your first success: one approved folder, one Editor with saved access and one prepared clip imported into Resolve.
Editor · connect to your libraryBring Nexus into Resolve.
You need a supported DaVinci Resolve Studio installation, the matching Nexus plugin and your own Nexus library account. Ask your Admin for the Coordinator address and access to a prepared folder. Working alone? Follow Admin setup to create your Editor account and grant it folder access; no website signup is needed to download Nexus.
-
Install the matching Resolve plugin.
Close Resolve before installing. Use the Windows plugin installer or macOS PKG, then reopen Resolve.
macOS installation steps and screenshots
Continue → Install → authorize with Touch ID or your Mac password → Close.
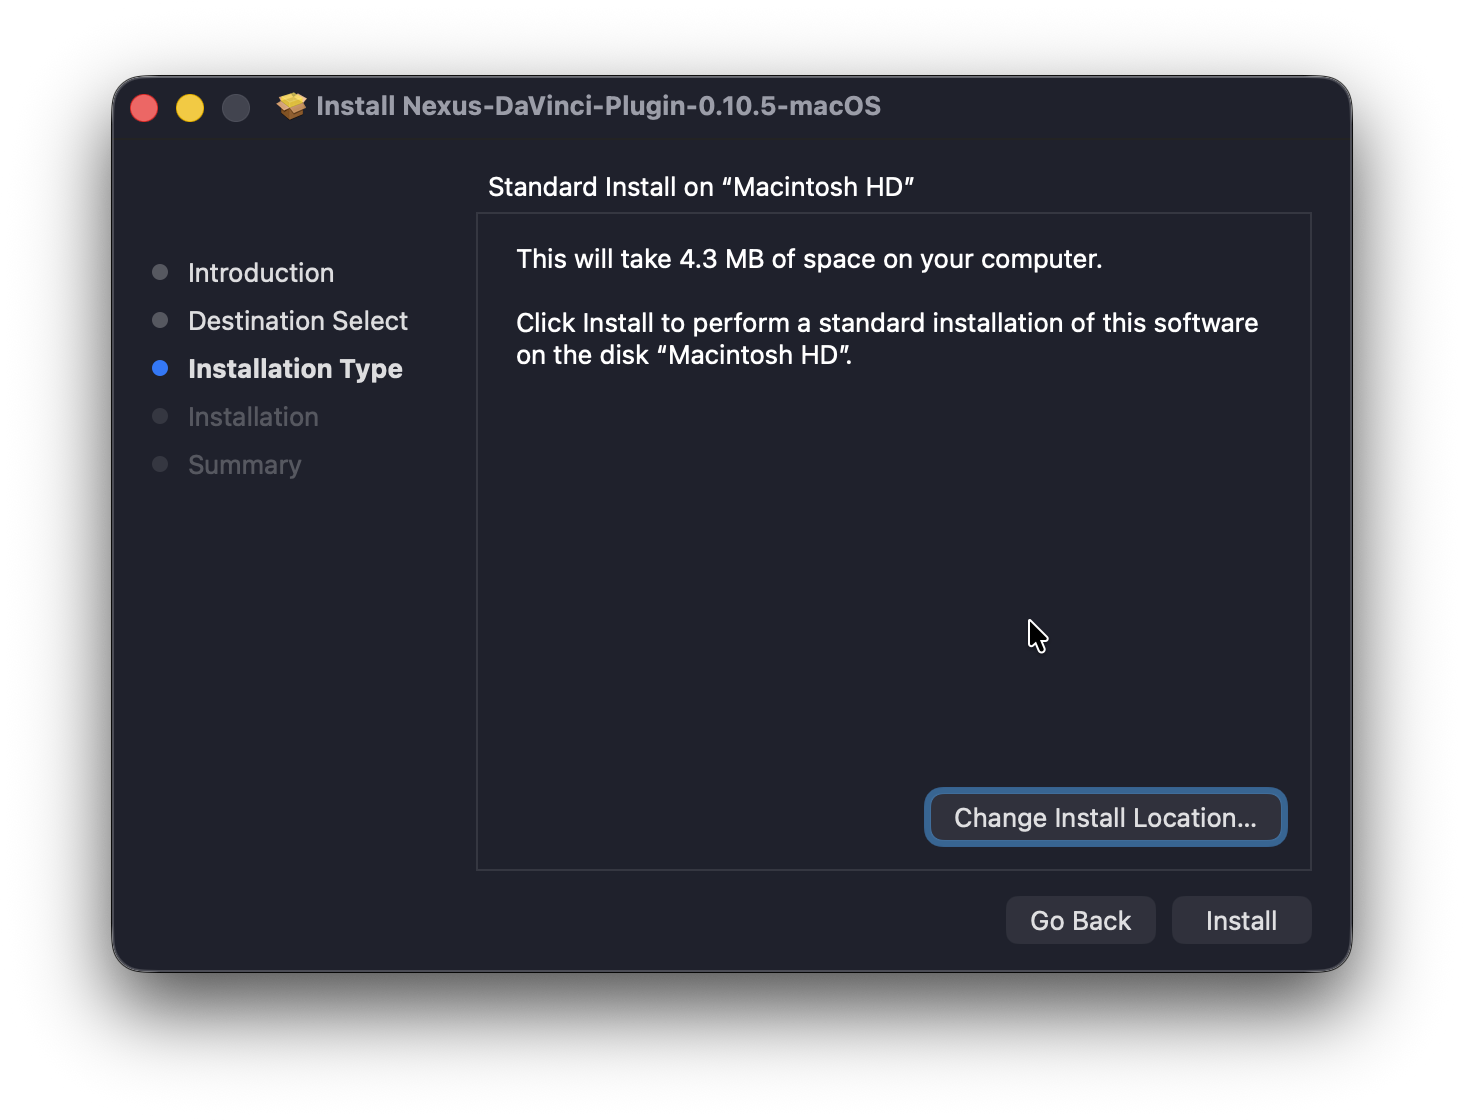
Nexus plugin 0.10.5 on macOS: choose Install to continue. Select the image to enlarge. 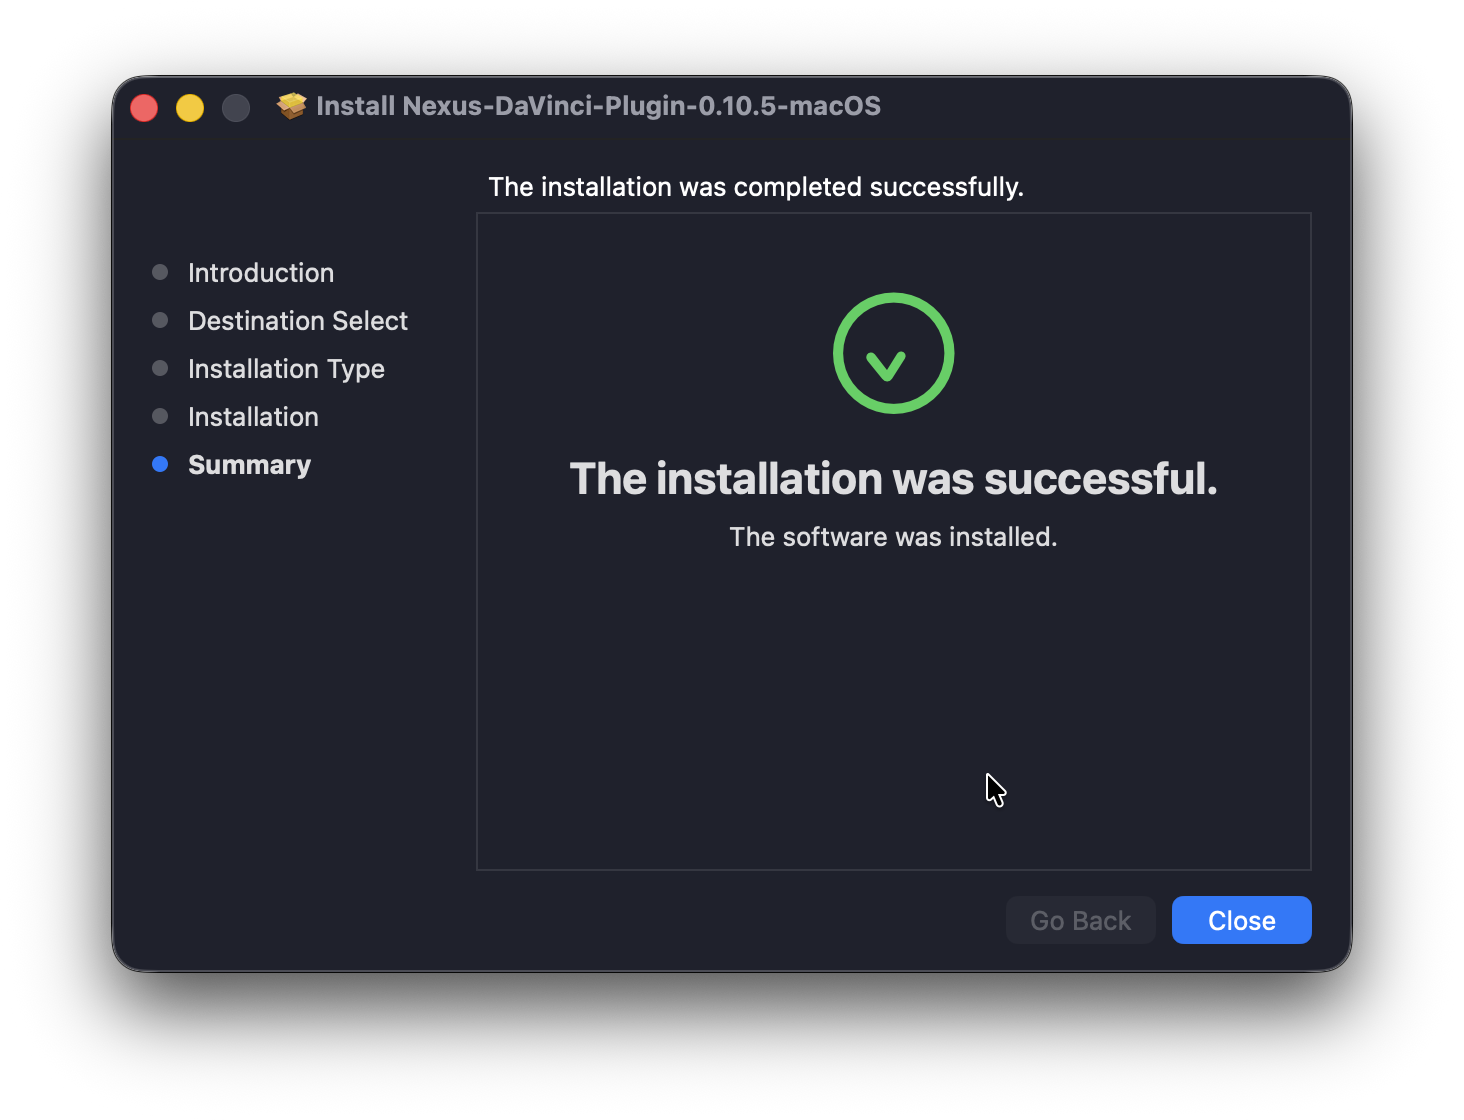
The successful summary confirms installation; next open Nexus inside Resolve. Select the image to enlarge. If Nexus is missing
Confirm the plugin package matches your operating system and Resolve version, and that Resolve was restarted after installation.
-
Open Nexus from Resolve.
Open a project, then choose Workspace → Workflow Integrations → Nexus. Check: the Nexus window opens.
macOS menu screenshot
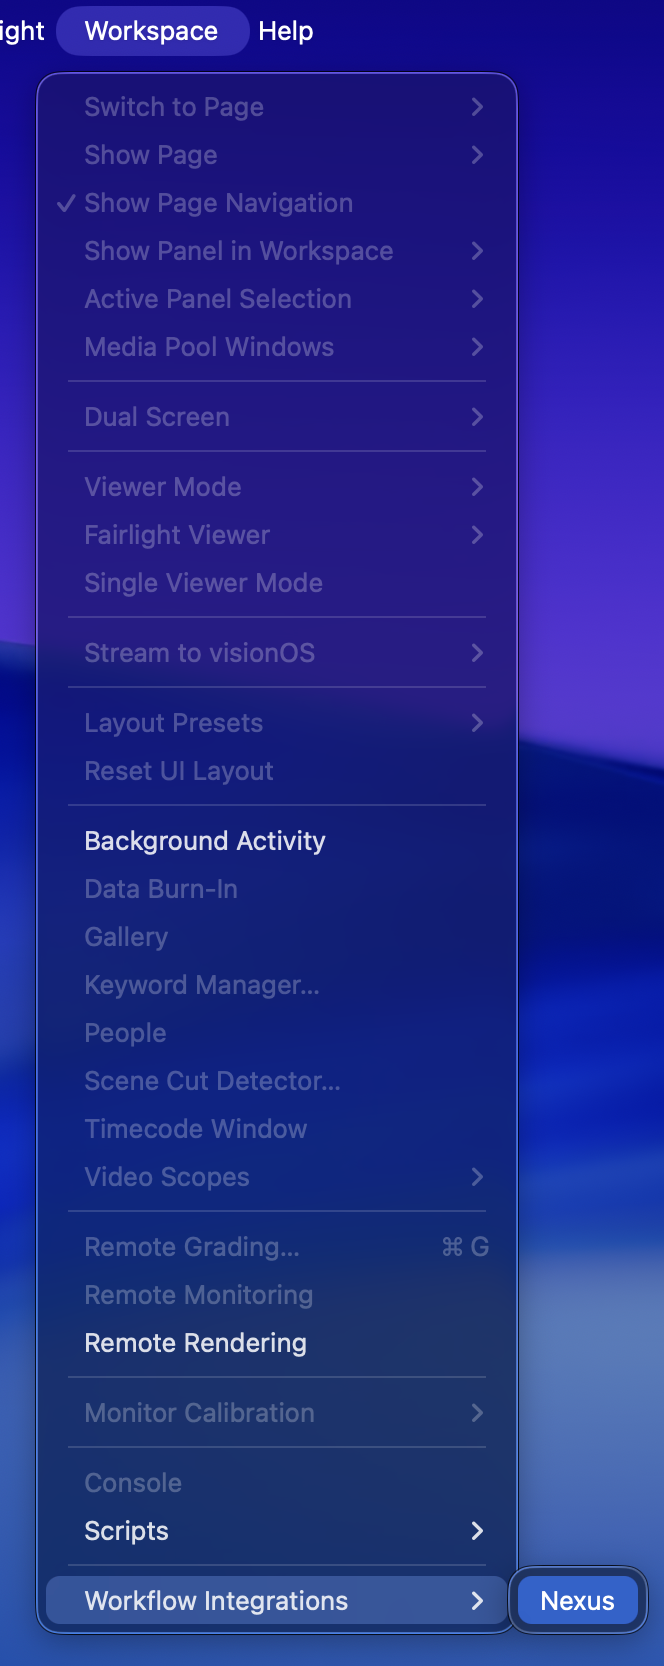
Resolve Studio 20.3.2 on macOS. Open Nexus from Workflow Integrations. Select the image to enlarge. -
Connect to your Coordinator.
Choose Find Coordinator or Enter Address. Use the Coordinator address supplied by your Admin. If a trust prompt is unexpected or you cannot verify its certificate details, stop and ask your Admin before continuing. See connection and certificate help.
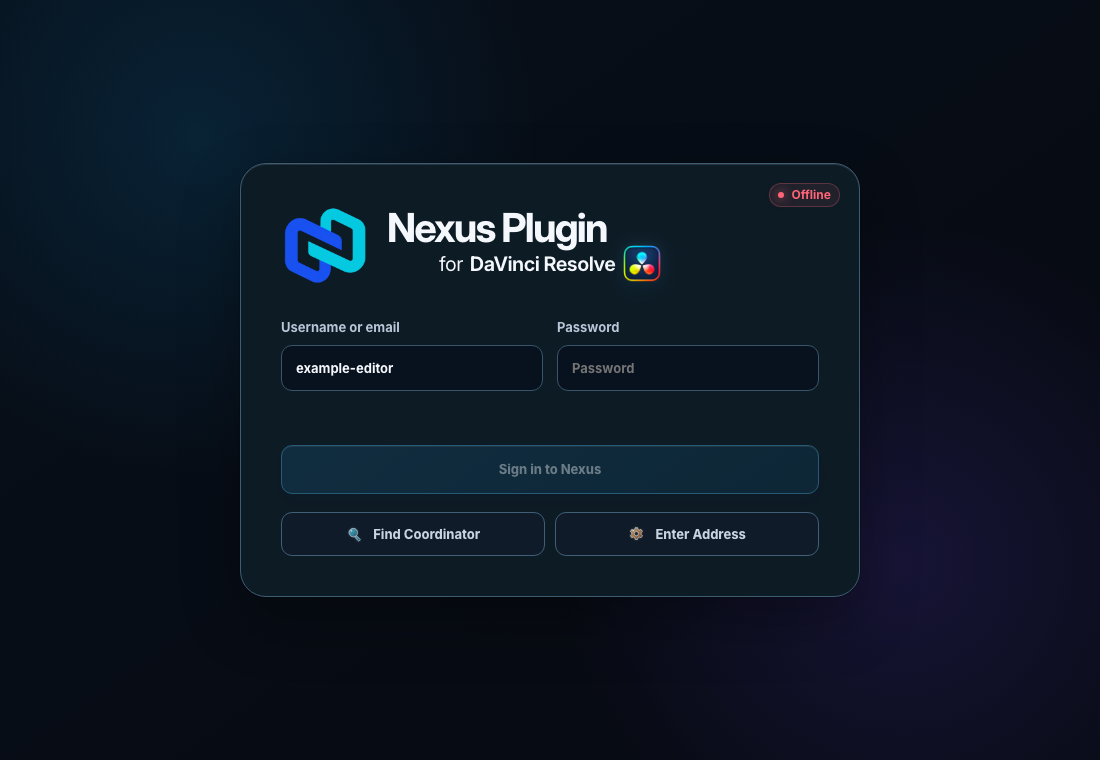
Find Coordinator and Enter Address are the two connection starting points. Use your own account; the name shown is an example. Select the image to enlarge. If the sign-in screen is already Online
Nexus may remember your previous Coordinator. Reinstalling the plugin does not necessarily clear that address. Sign in with your own Nexus account; if this is the wrong library, ask your Admin before changing saved settings.
If discovery finds nothing
Enter the Admin-provided address manually and check that the Coordinator is running and reachable from your network. An empty discovery list does not establish that the Coordinator is unavailable.
-
Sign in and select a prepared clip.
Sign in with your Nexus account, find a folder shared with you and select a clip. For video and audio, its proxy (an editing copy of the source file)must have completed processing.
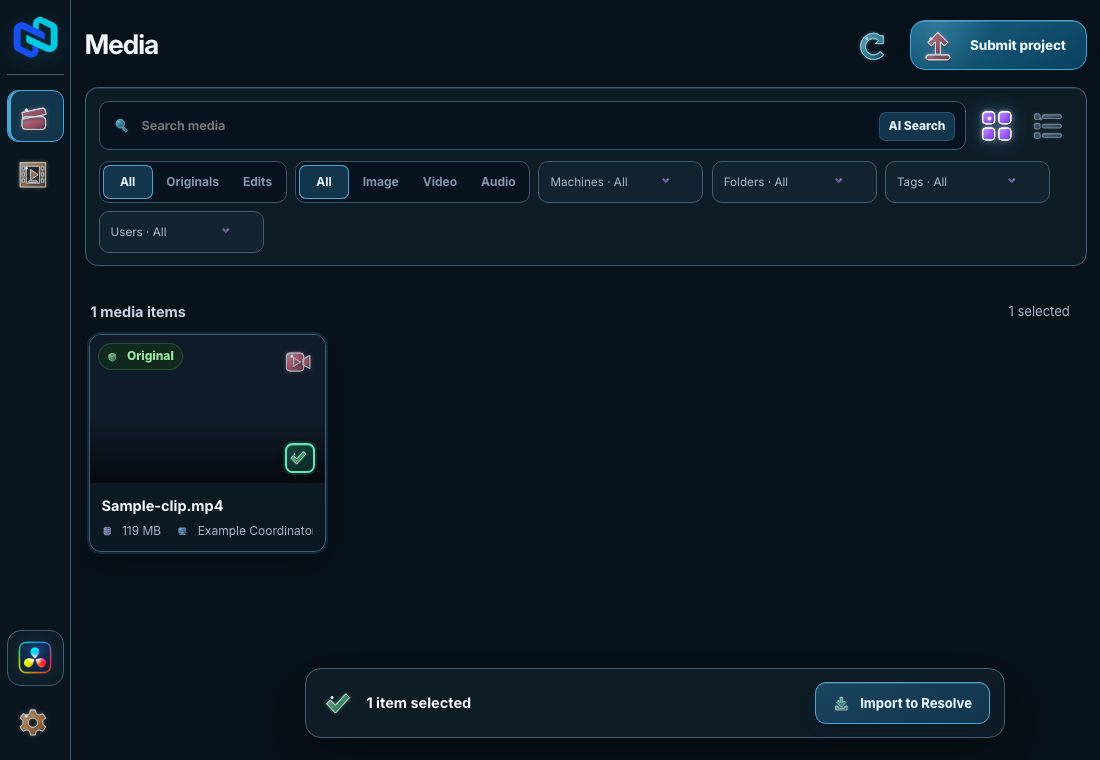
Selecting a clip reveals Import to Resolve at the bottom of the library. Select the image to enlarge. If the library is empty
Clear search and filters, then ask the Admin to check processing and your saved folder access. Do not use the shared Admin account as a workaround.
-
Open a clip’s details and check its preview.
Choose the clip card to open its details. Use the selection checkmark when you want to select it for import instead. The drawer shows the file’s metadata, availability and preview. Video and audio previews have playback controls; still images display directly.
A ready still image displays directly in the preview panel. This is a fictional sample image. Select the image to enlarge. Playback check: intermittent Media playback has been reported in the macOS 0.10.5 plugin. A visible thumbnail does not confirm playback. Preview readiness and import readiness are different checks; keep playback separate from import and rendering.
If it says Preview is not ready
Check processing with your Admin and whether the source is available. Do not assume the clip is corrupt. Use the import button’s state and any reported error to check import readiness.
If Play does not start
Note the filename and any error, try one other prepared clip, and ask your Admin to check the same clip in the web panel.
-
Use tags to find the clip again.
In the same details drawer, AI Tags and User Tags are separate. Under User Tags, enter a short useful label and choose Add. Confirm the new tag appears. Use the tag’s remove button to remove an unwanted user tag. Back in Media, use the search and Tags filter to narrow the library.
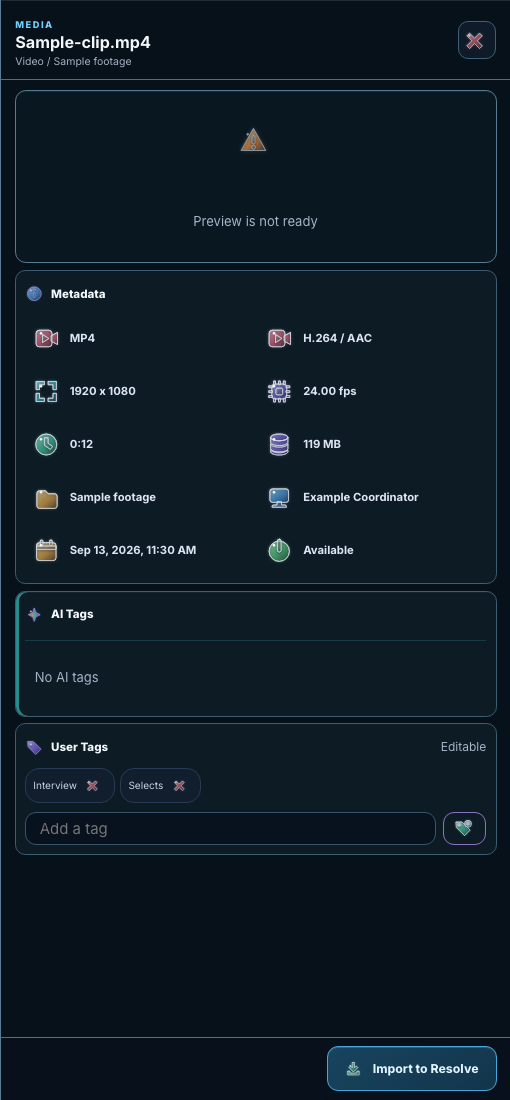
Preview is not ready is distinct from the metadata and import controls below it. User tags Interview and Selects are examples; no AI tags are present. Select the image to enlarge. If AI tags are missing or a user tag will not save
AI processing may be disabled or unfinished. AI tags are optional for browsing and importing prepared media. If a user tag fails to save, keep the error and check your connection before trying again.
-
Import to Resolve and start editing.
Choose Import to Resolve. Nexus downloads the prepared video or audio proxy locally and imports it into the Media Pool. Still images use the original file instead of a proxy.
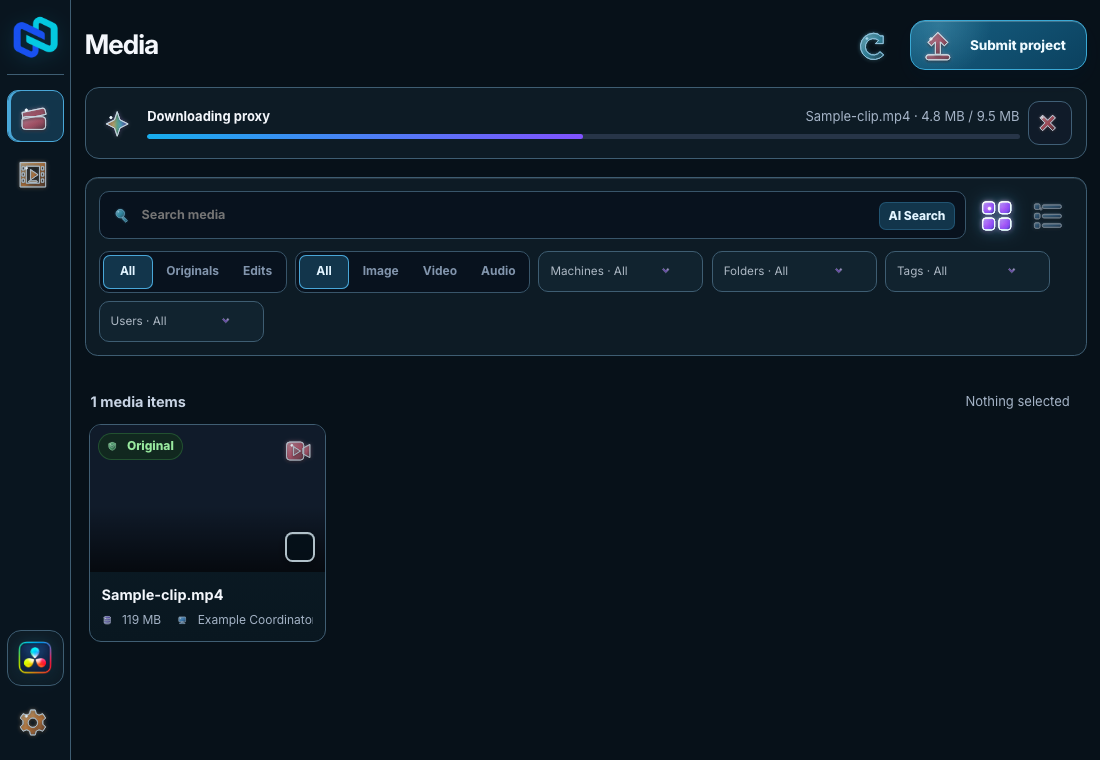
Wait for the download and Media Pool import to finish; transfer progress alone is not confirmation of a successful import. Select the image to enlarge. Check: the clip appears in Resolve’s Media Pool and can be added to a timeline. Imported proxies remain editable if the source drive disconnects. Browsing and new imports still need a reachable Coordinator and ready media.
If the import fails
Read the reported error, check local storage space and Coordinator connectivity, and confirm that your Resolve project is open. Keep the clip name and error for your Admin if the problem continues.
Your first success: one clip from your shared library, imported and editable in Resolve.
Additional computers · optionalConnect more folders with a
Worker.
A Worker connects selected folders on another Windows computer to your existing Coordinator. An editor does not need a Worker just to browse or import media. You need an Admin to generate the pairing code and approve access; the person at the extra computer installs and connects the Worker.
-
Install the Windows Worker.
Use the Worker installer supplied with beta 0.10.5 and follow that package’s installation instructions. Open the Worker app on the computer that has access to the additional footage.
-
Admin: generate a pairing code.
In the Admin Panel, open Machines and choose Add Worker to obtain the Coordinator address and pairing code. Share the code privately with the person connecting the machine.
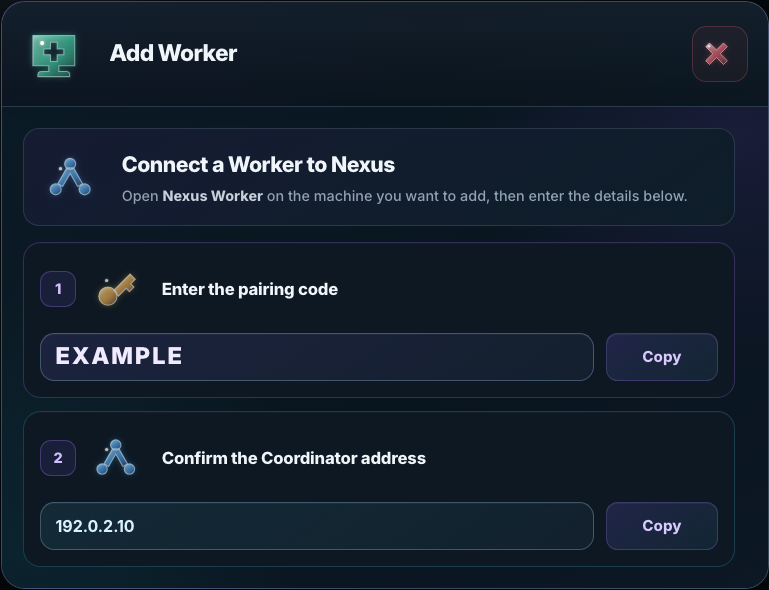
Copy the address and the newly generated code from your own Admin Panel. EXAMPLE and 192.0.2.10 are fictional and will not connect your Worker. Select the image to enlarge. -
On the extra computer: pair the Worker.
In the Worker app, enter the Coordinator IP or URL and Pair Code, then choose Pair Worker. If discovery does not find the Coordinator, enter its address manually.
If pairing fails: check the address, network connection and the code with your Admin. Use a newly generated code when the current one is no longer valid. Do not post the code in a support screenshot.
-
Admin: approve the machine, then its folders.
In the Admin Panel’s Machines view, select Approve for the pending Worker and confirm the named machine. The person at the extra computer then uses Add Folder in the Worker app to select folders or attached storage. In Shared Folders, select that paired Worker computer and approve its folders. The same folder approval states apply, but choose the Worker rather than the Coordinator. Then assign Editor access.
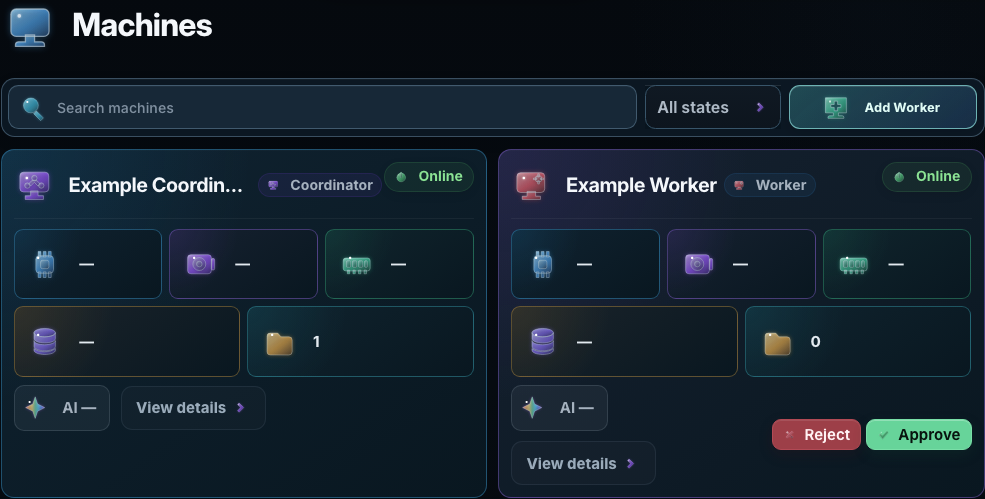
A connected Worker can still await approval. Select Approve for the intended machine; this does not approve its folders or grant Editor access. Select the image to enlarge. 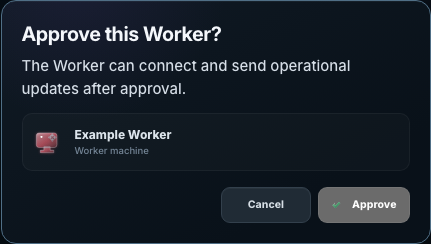
Check the machine name before confirming. This example approves Example Worker. Select the image to enlarge. Check: the Worker is connected, the folder is approved and its media processing is ready. Approving the machine does not automatically approve every folder or grant Editor access.
-
Keep source storage available when needed.
Keep the Worker connected and the original files accessible when Nexus needs to retrieve them for a full-quality render. An imported proxy can remain editable while that source is offline; this does not make the original available to the Coordinator.
If a folder becomes unavailable: check the Worker connection and whether its drive is mounted and accessible. Submitted renders run on the Coordinator, not the Worker.
After your first editSubmit a render and follow the result.
First complete one successful Nexus import. Use a small test timeline before submitting a larger project.
-
Ask your Admin to prepare the Coordinator.
On the Coordinator computer, keep the Nexus Coordinator app and a supported version of DaVinci Resolve Studio running in its signed-in user session. Make sure Nexus can retrieve the original footage. A Worker does not run this render.
-
Set the render settings and submit.
On your editing computer, in Resolve, choose a timeline containing at least one clip imported through Nexus. Add a video job to Resolve’s render queue to establish the settings. In Nexus, choose Submit project, provide the output name, add an optional review note, then confirm.
Check: a new submission appears in Workspace. If submission fails, keep the error and check the selected timeline, Nexus-imported media and render settings before retrying.
-
Continue editing and check Workspace.
Nexus submits a project snapshot. The queued render uses the version you submitted while you continue editing; later timeline changes need a new submission.
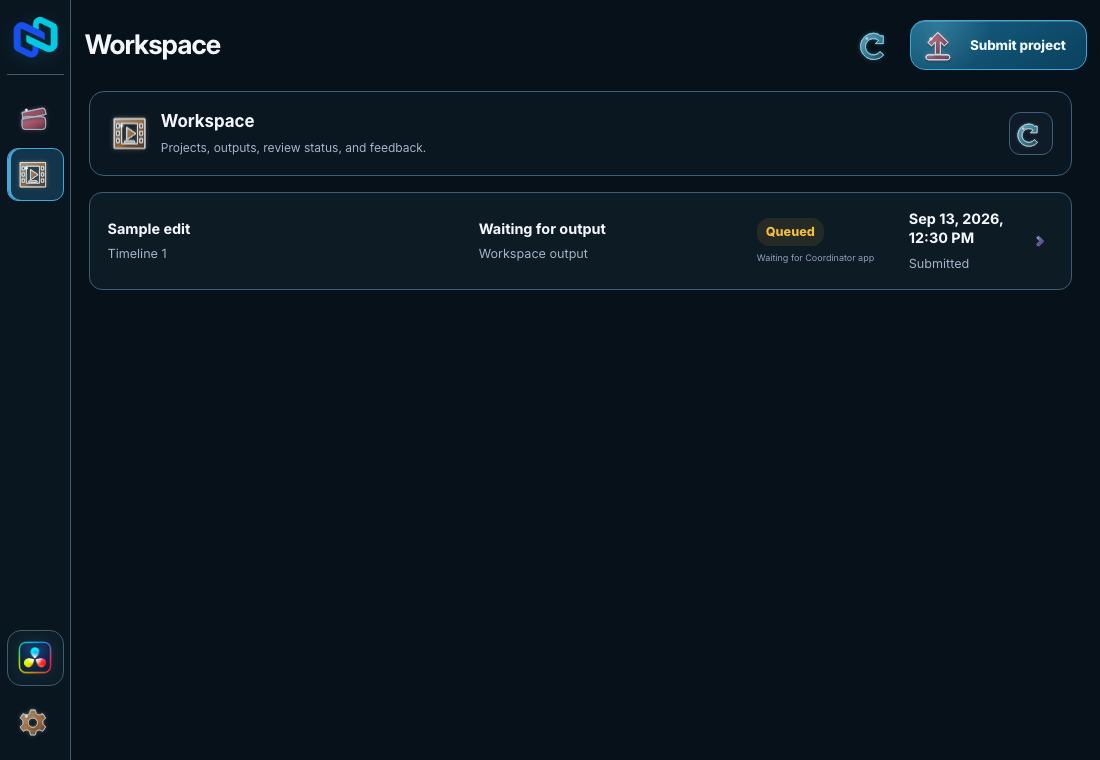
Workspace shows the submission state and the reason it is waiting. Select the image to enlarge. If it says Waiting for Coordinator app: ask the Admin to check the Coordinator desktop app and Resolve session. If it reports unavailable media, check the relevant source computer and drive. Use the specific status or error shown; queued does not mean completed.
After a Coordinator restart or power outage: the Admin should sign in on that Windows computer and check the Nexus desktop app and Resolve scripting readiness. Service Online alone is not enough. Recovery after Remote Desktop login is under investigation in 0.10.5. If the job is Failed, preserve its error and have the Admin use the existing job’s restart control after readiness returns. Do not submit duplicate jobs or repeatedly restart services as a routine workaround.
-
Check render, output and review separately.
In Workspace, select the submission row to open its details. Render: Completed describes the render job; Output: Ready describes its processed output; Review: In Review means a review decision is still pending. A completed render is not automatically an approved edit.

Render completion, output availability and the review decision are separate states. In Review is still awaiting a decision. Select the image to enlarge. Check: use the video preview’s Play control in those details to watch the actual output from beginning to end, including sound, duration and the intended timeline. If a preview is not ready, check output processing and the reported status before submitting another copy. A status label alone cannot confirm picture or audio correctness.

Approved records the Admin’s review decision for this submission. Later edits need their own submission and review. Select the image to enlarge. -
Review the output and respond.
When the output is ready, open it from Workspace. Admins can preview it and leave feedback or approve or reject it in the web panel. The submitting Editor can follow the conversation in Nexus.
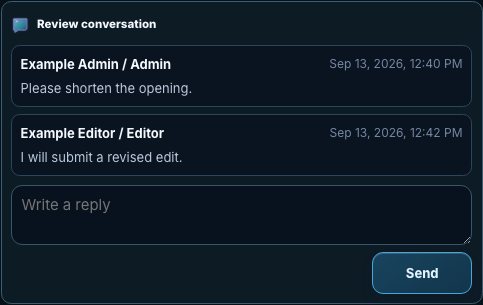
The conversation stays with the submission. In this example, the Editor plans a revised edit. Select the image to enlarge. For a revision: update the edit, submit a new snapshot and confirm its new Workspace entry. A reply to a comment does not submit your changed timeline.
Your first success: a ready output you can preview, with any requested revision tracked in its own submission.
Storage, network and optional AI requirements
- Match the build. Check your operating system, processor, Resolve edition/version and plugin package against its release notes. Use the tested compatibility listed beside each download.
- Windows beta installers are unsigned. Windows SmartScreen may show an unknown-publisher warning. Use only the official download, compare its published checksum and follow its installation guide. Do not disable system-wide protection.
- Check BRAW support for this build. The supplied Coordinator and Worker packages do not bundle BRAW processing. Do not use these packages for a BRAW workflow.
- Plan storage. Allow disk space for the library, generated media and local proxy downloads. Keep originals accessible for final rendering.
- Have editor access. Editors need their Coordinator address and a Nexus account from their Admin. A Worker is not required just to edit.
- Use a trusted network. Start on your local network. Setup and model downloads may need internet. Beyond the studio, use a configured private or routed connection and follow the build’s network guidance.
- Keep AI optional. AI processing is Windows-only through beta and version 1.0. It needs a CUDA-13-compatible NVIDIA GPU (Turing/RTX 20 or newer), at least 4 GB VRAM and driver 580 or newer. AI is off at first setup; models need about 3.5 GB of downloads. Ordinary editors do not each need an AI-processing GPU.